Redirect Output to a File or Program
After completing the work in this module you will be able to:
Today we're going to learn about shell redirection, which is a powerful way to control where your command output goes instead of just seeing it on your screen. Think of redirection like changing the destination of a letter – instead of always going to your monitor, we can send command output to files or even to other commands. This is incredibly useful for saving output, creating logs, or building complex command chains that we'll use throughout your Linux career.
[user@host ~]$ ls -R /etc/
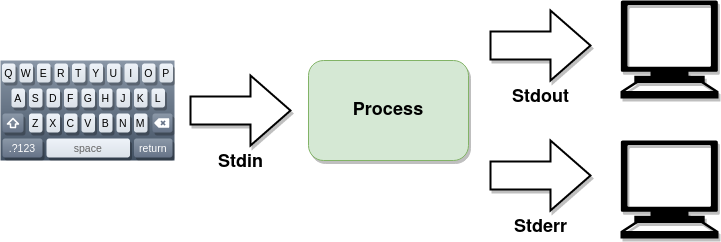
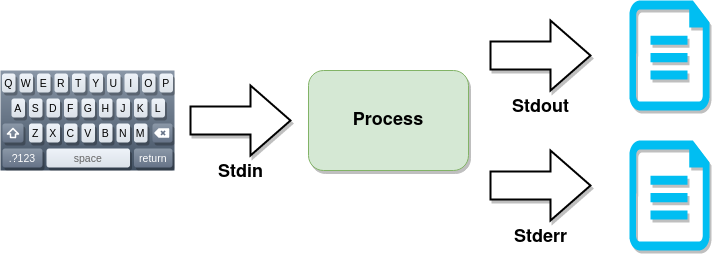
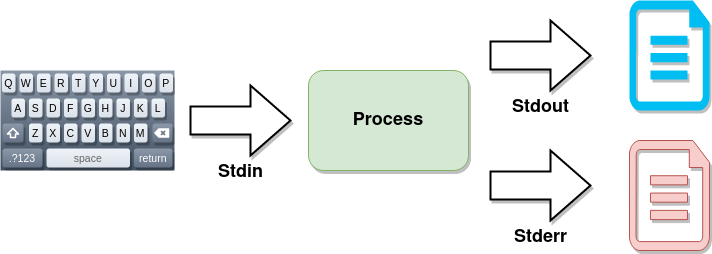
Every Linux program communicates through three main channels, which we call "streams." Standard Input (stdin) is how you send information to a program, usually through your keyboard. Standard Output (stdout) is where programs send their normal results, and Standard Error (stderr) is where error messages go. By default, both stdout and stderr display on your monitor, but we can redirect these streams to different destinations. Understanding these three streams is essential because they're the foundation of how redirection works.
[user@host ~]$ ls -R /etc/ > file1
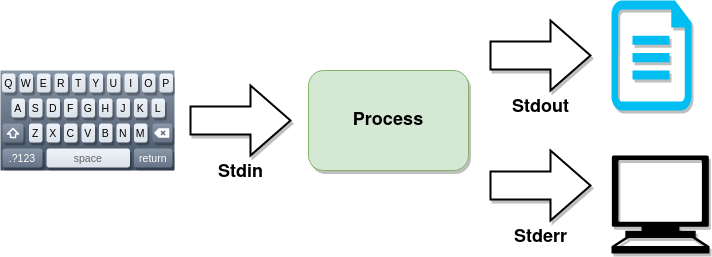
The greater-than symbol (>) redirects standard output to a file, completely replacing any existing content in that file. For example, ls > filelist.txt takes the output of the ls command and writes it to a file called filelist.txt instead of showing it on your screen. This is perfect for capturing command output for later review or for creating input files for other programs. Remember that using > will overwrite the entire file, so be careful not to accidentally destroy important data.
[user@host ~]$ ls -R /etc/ >> file1
Sometimes you want to add new output to an existing file without losing what's already there – that's where the double greater-than (> >) comes in. Using > > appends new output to the end of a file, preserving all existing content. For example, date >> log.txt adds the current date and time to the end of your log file. This is extremely useful for creating log files where you want to track activities over time without losing previous entries.
[user@host ~]$ ls -R /etc/ 2> file2
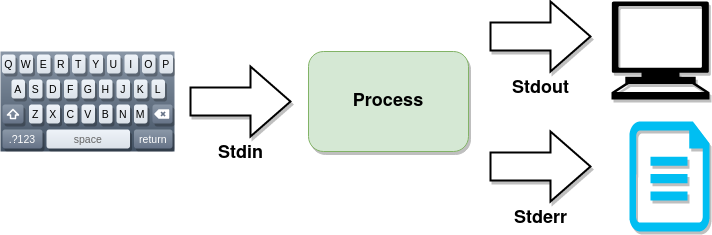
Error messages go to a separate stream called standard error, which we can redirect independently using 2>. This number 2 represents the stderr stream (1 is stdout, 0 is stdin). For example, find / -name "*.txt" 2> errors.txt searches for all text files but sends any "permission denied" errors to a file instead of cluttering your screen. This separation allows you to capture errors for troubleshooting while still seeing normal output, or vice versa.
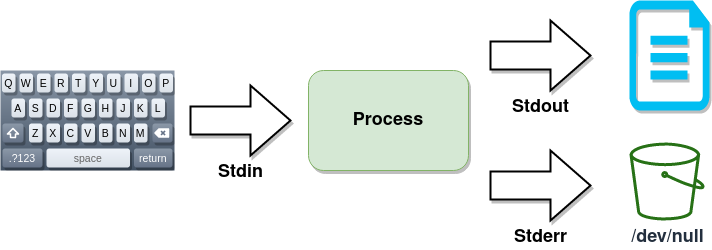
[user@host ~]$ ls -R /etc/ > file1 2> /dev/null
Sometimes you don't want to see error messages at all, especially in scripts. Linux provides a special file called /dev/null that acts like a "black hole" – anything sent there disappears forever. For example, command 2> /dev/null runs a command but throws away all error messages. This is particularly useful in shell scripts where error messages might confuse users or when you're testing commands and only care about success or failure, not the specific error details.
[user@host ~]$ ls -R /etc/ > file1 2>&1
You can combine both standard output and standard error to the same file using command > alloutput.txt 2>&1, where the 2>&1 means "send stderr to the same place as stdout.
[user@host ~]$ ls -R /etc/ > output.txt 2> errors.txt
You can redirect standard output and standard error to different files in the same command, giving you complete control over where information goes. For example, command > output.txt 2> errors.txt sends normal output to one file and errors to another. This flexibility lets you organize command output exactly how you need it for different situations.
[user@host ~]$ cat /etc/passwd | wc -l
A pipe, represented by the vertical bar (|), takes the output of one command and feeds it as input to another command. This lets you create powerful command combinations by chaining simple commands together. Let's look at a practical example: cat /etc/passwd | wc -l counts the number of user accounts on the system. The cat command displays the contents of the password file, the pipe sends that output to wc -l, which counts the lines. Since each line in /etc/passwd represents one user account, this tells us how many accounts exist. Pipes are one of Linux's most powerful features because they let you combine simple tools to solve complex problems. Think of it like an assembly line where each command performs one specific task.

After reading this section in the textbook complete the quiz in Canvas.

Unlike Windows, Linux system administration relies heavily on editing plain text configuration files. While graphical editors exist, they're often impractical when managing remote servers over slow network connections or when working in minimal environments. Learning to edit text files efficiently from the command line is an essential skill that every Linux administrator must master. These skills will serve you well whether you're configuring web servers, editing system settings, or writing shell scripts.
Vim has become the standard command-line editor in Linux because it's installed on virtually every Linux distribution, works efficiently over slow network connections, and allows for incredibly fast and precise editing once you learn it. While Vim isn't intuitive like modern graphical editors, its power and ubiquity make it invaluable. Every system administrator encounters Vim at some point, so having basic Vim skills ensures you can work effectively on any Linux system you encounter.
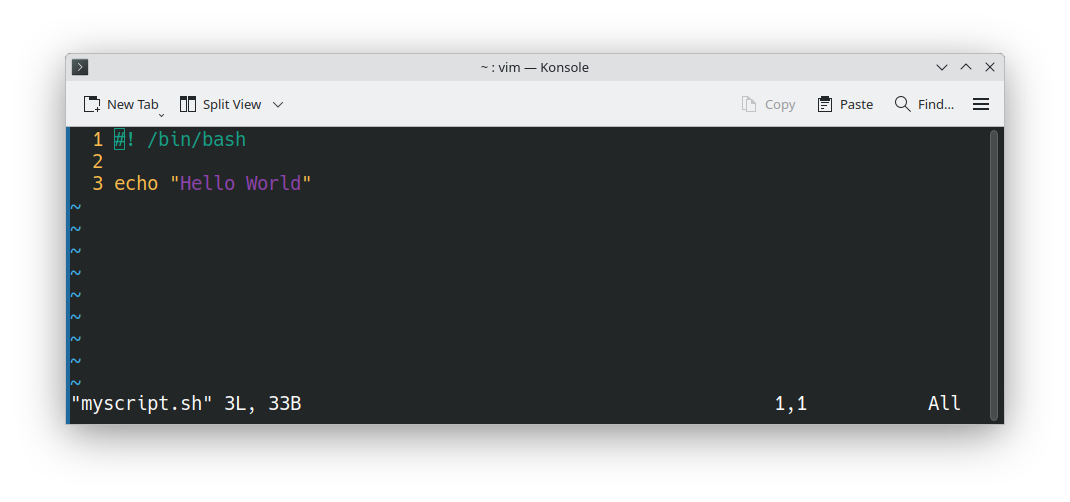
To start editing a file in Vim, simply type vim filename at the command prompt. If the file doesn't exist, Vim will create it when you save. Notice that Vim automatically recognizes many file types and provides syntax highlighting – different colors for different parts of your code or configuration file. This syntax coloring helps catch errors as you type and makes files much easier to read. For example, if you open a shell script (.sh file), Vim will highlight commands, variables, and comments in different colors.
Unlike other editors, Vim operates in different modes, and understanding these modes is crucial. When you first open Vim, you're in Normal mode, where keystrokes move you around the document rather than inserting text. To actually type and edit text, press i to enter Insert mode – now you can type normally. To save your work or perform other commands, press Escape to return to Normal mode, then press colon (:) to enter Command mode where you can type commands like :w to save or :q to quit. This mode system is what makes Vim so powerful once you learn it.
Here are the essential Vim commands you'll use most often: i enters Insert mode so you can type, Escape returns you to Normal mode, :w saves your file, :q quits Vim, and :wq saves and quits in one command. In Normal mode, use arrow keys or h, j, k, l to move around. These basic commands will handle 90% of your editing needs. Don't worry about memorizing advanced commands yet – focus on getting comfortable with these basics first, and the rest will come naturally with practice.
.vimrc Configuration File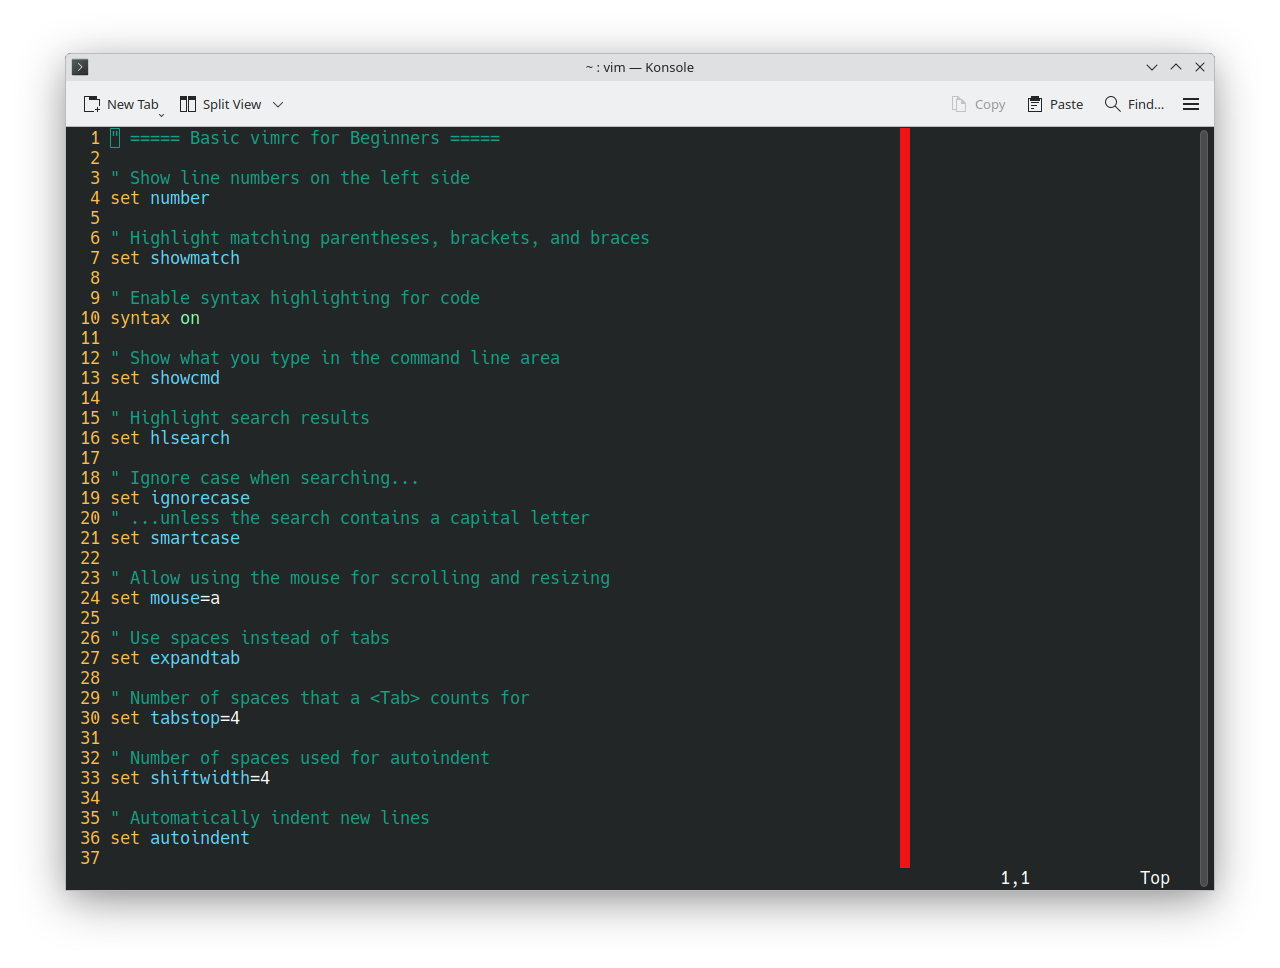
You can customize Vim's behavior by creating a hidden file called .vimrc in your home directory. This file contains commands that run every time you start Vim. As you become more comfortable with Vim, you'll develop your own preferences and can customize your .vimrc accordingly.
Vim automatically creates hidden swap files as you edit, which serve as backups in case Vim crashes or your network connection drops. If you try to open a file that was being edited when Vim crashed, you'll see a recovery message offering to restore your unsaved changes. This feature has saved countless hours of work for system administrators working on remote servers with unreliable connections. Usually you'll want to recover your changes, but Vim gives you options to handle each situation appropriately.
vimtutor Command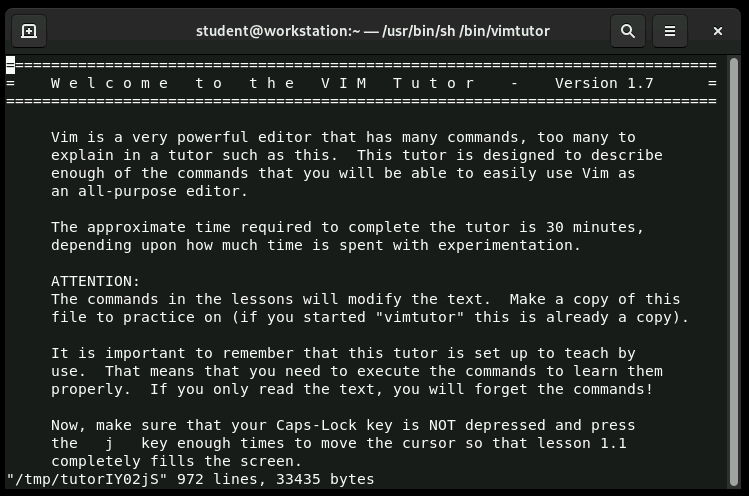
The best way to learn Vim is through hands-on practice, and Linux provides a perfect tool for this: vimtutor. Simply type vimtutor at the command prompt to start an interactive tutorial that teaches you Vim basics through guided exercises. The tutorial creates a practice file so you can learn without fear of damaging important documents. I strongly recommend spending 30 minutes with vimtutor – it's the fastest way to build the muscle memory you need for effective Vim usage.

[user@host ~]$ printenv $PATH
/home/user/bin:/usr/local/bin:/usr/bin:/bin
[user@host ~]$ printenv $HOME
/home/user
Linux uses variables to store information that programs and the shell need to function properly. These variables set up your working environment every time you open a shell. For example, the PATH variable tells the shell where to look for commands, and the HOME variable points to your home directory. Understanding variables is crucial because they control how your shell behaves, where programs look for files, and how your system is configured. Think of variables as labeled containers that hold important system information.
[user@host ~]$ VarName=value
To create a shell variable, use the format name=value with no spaces around the equals sign. Variable names in Linux are case-sensitive, so pet and PET are different variables. To use a variable's value, prefix it with a dollar sign ($). For example, pet=hamster creates the variable, and echo $pet displays "hamster." Shell variables only exist in the current shell session and disappear when you close the terminal. This temporary nature makes them perfect for storing information you only need temporarily.
set command
[user@host ~]$ set | less
BASH=/bin/bash
BASH_VERSION='4.4.23(1)-release'
HISTFILE=/home/user/.bash_history
HISTFILESIZE=1000
OSTYPE=linux
PAGER=less
PATH=/home/user/bin:/usr/local/bin:/usr/bin:/bin
output omitted...
The set command displays all variables currently defined in your shell, including both environment variables (which are passed to programs you run) and shell variables (which are only available to the current shell). This command produces a lot of output because Linux uses many variables to control system behavior. You'll see familiar variables like PATH, HOME, and USER, plus many others that control various aspects of your shell environment. This command is useful for troubleshooting when programs aren't finding files or behaving as expected.
[user@host ~]$ pet=hamster
[user@host ~]$ echo "My favorite pet is my $pet."
My favorite pet is my hamster.
You retrieve a variable by placing a dollar sign in front of the variable name. In this example, the dollar sign tells the shell that the second instance of pet should be replaced with the value hamster.
[user@host ~]$  PS1="[\u@\h \W]\> "
[user@host ~]>
The PS1 variable controls what your command prompt looks like. By default, it shows your username, hostname, and current directory, ending with a $ for regular users or # for root. You can customize this to show different information or use different formatting. For example, changing PS1 to show just a > character creates a minimal prompt. You can include colors, timestamps, or other information. A customized prompt can make your terminal more informative and personal, though be careful not to make it so complex that it becomes distracting.
[user@host ~]$ export EDITOR=nano
Many Linux programs need to open a text editor for user input – for example, when you compose an email or edit a configuration file. The EDITOR environment variable tells these programs which editor to use. By default, it might be set to nano or vi, but you can change it to your preferred editor using the export command. For example, export EDITOR=nano makes Nano the default editor for all programs that need text editing capabilities. This change only lasts for your current session unless you make it permanent.
[user@host ~]$ echo "export EDITOR=nano" >> ~/.bash_profile
To make environment variable changes permanent, add them to your ~/.bash_profile file, which runs every time you start a new shell session. For example, adding export EDITOR=vim to this file ensures that your editor preference is set every time you log in. The bash_profile file is your personal configuration file where you can set variables, define aliases, and customize your shell environment. Changes to this file take effect the next time you start a new shell session.
[user@host ~]$ type ls
ls is aliased to 'ls --color=auto'
Aliases let you create shortcuts for frequently used commands, saving typing and reducing errors. For example, many systems have ls aliased to ls --color=auto so directory listings automatically show colors. You can see what an alias actually does using the type command. Creating aliases for complex commands you use regularly can dramatically improve your efficiency. For instance, you might create an alias ll for ls -la to quickly get detailed file listings. Aliases are especially useful for commands with lots of options that you always use together.
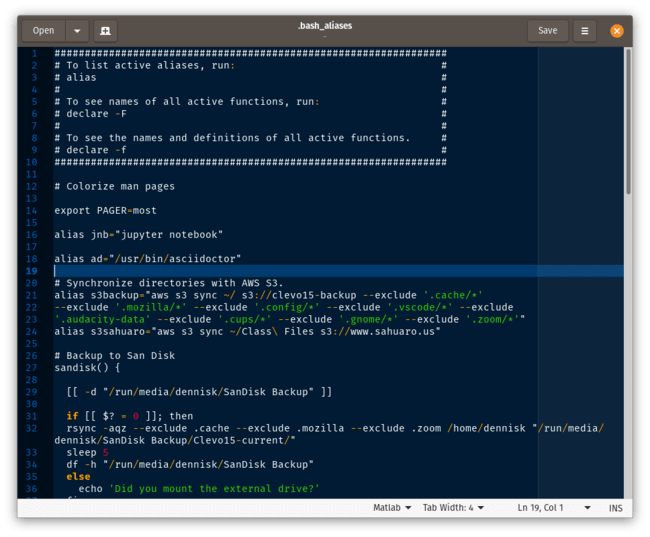
Like variables, aliases only last for the current shell session unless you make them permanent. To keep aliases across sessions, add them to a ~/.bashrc file, which runs every time you start a new shell. The example shows several practical aliases: shortcuts for common commands, safety aliases that ask for confirmation before dangerous operations, and even a function for backing up to cloud storage. Building a collection of useful aliases over time will make you much more efficient at the command line.
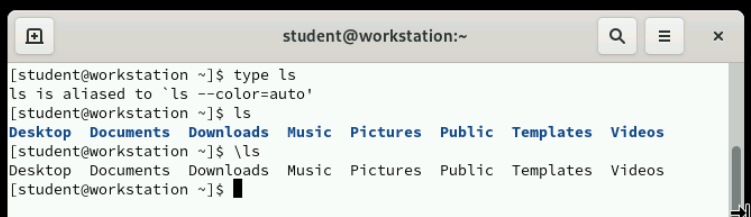
Sometimes you want to run the original version of a command without its alias. Put a backslash (\) before the command name to bypass any alias. For example, if ls is aliased to ls --color=auto, running \ls executes the plain ls command without colors. This is useful when aliases change command behavior in ways you don't want for a particular task, or when troubleshooting problems that might be caused by alias modifications. The backslash technique works for any aliased command.
In this exercise you use shell variables and variable expansion to run commands, and set an environment variable to adjust the default editor for new shells.

This lab gives you practical experience editing text files with Vim using the techniques we've discussed. You'll practice entering Insert mode, making changes, saving files, and navigating between Vim's different modes. When you complete the lab, you'll submit a screenshot showing the output of the lab grade edit-review command, demonstrating that you successfully completed the editing tasks. This hands-on practice is essential for building the muscle memory needed to use Vim effectively in real-world situations.
ls $lab_file.dd also works to remove lines..txt extension.tail command to check your work.In this lab you edit a text file with the Vim editor. When you complete the lab submit a screenshot of the output of the lab grade edit-review command.
Today we've covered three fundamental Linux skills: shell redirection for controlling command output, text editing with Vim for system configuration, and environment variables for customizing your shell experience. This is the end of the presentation.
Created on 17 February 2025 by Dennis Kibbe. Last modified on 3 Sepetember by DNK.
Keyboard Shortcuts
This slide presentation was created by B6Plus. The audio accompanying this presentation is AI-generated.