Describe User and Group Concepts
Introduction

After completing the work in this module you will be able to:
su and sudo to gain root privileges.
User accounts are Linux's way of creating separate workspaces for different people and programs on the same computer. Just like having separate user profiles on a shared Windows computer, each Linux user account provides security boundaries that prevent one user from accidentally or maliciously affecting another user's files. Every process that runs on your system - from your web browser to system services - operates under a specific user account with defined permissions. This separation is what makes Linux inherently more secure than systems where everything runs with full privileges.

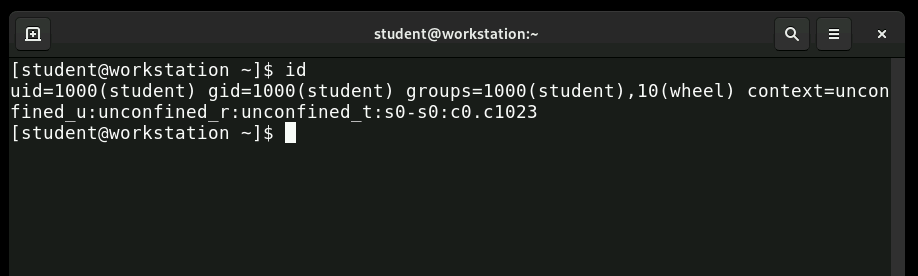
A user account provides security boundaries between different people and programs that can run commands. User accounts are fundamental to system security. Every process on the system runs as a particular user. Every file has a particular user as its owner and belongs to a group.
Red Hat Enterprise Linux follows a systematic approach to assigning User ID numbers, or UIDs. Think of UIDs as employee ID numbers in a large company - they help the system quickly identify and categorize different types of accounts. System accounts (like those used by services) typically get low numbers, while regular user accounts start at higher numbers like 1000. This organization helps administrators quickly identify what type of account they're looking at just by seeing the UID.
/etc/passwd File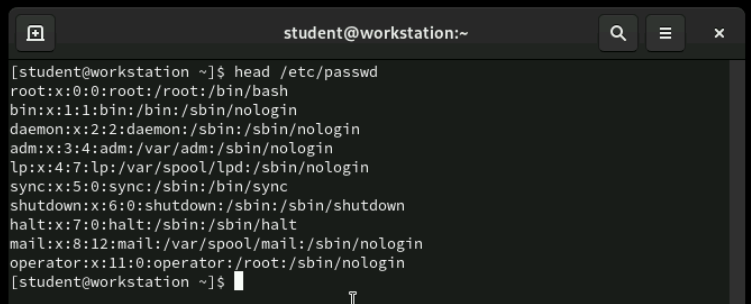
The /etc/passwd file is like the phone book of your Linux system - it lists every user account with their essential information. Each line represents one user, and the information is separated by colons, making it easy for the system to parse. Even though it's called "passwd," this file doesn't actually contain passwords anymore for security reasons. Let's examine what each field tells us about a user account.
[student@servera ~]$ grep student /etc/passwd
student:x:1000:1000:Joe Student:/home/student:/bin/bash
Here's what a real entry looks like in practice. Notice how each field is separated by a colon - this consistent format allows the system to quickly find specific information about any user. The layout might look cryptic at first, but once you understand the pattern, you can read user information like a pro. Let's break down each of these seven fields one by one.
student:x:1000:1000:Joe Student:/home/student:/bin/bash
The first field is simply the username - this is what people type when they log in. It's the human-readable name that identifies the account, like "john" or "student." This name must be unique on the system, just like you can't have two people with the same employee ID at work. The username is what you'll use in commands when you want to manage this account.
student:x:1000:1000:Joe Student:/home/student:/bin/bash
This field used to contain encrypted passwords, but that created a security problem since the /etc/passwd file is readable by all users. Now you'll typically see just an x here, which tells the system to look for the actual encrypted password in the more secure /etc/shadow file. Think of this as a forwarding address - it points the system to where the real password information lives.
student:x:1000:1000:Joe Student:/home/student:/bin/bash
The UID is the numerical identifier that the computer actually uses to track the user. While humans prefer names like "john," computers work faster with numbers. This is similar to how your social security number uniquely identifies you in government systems, even though people know you by your name. The system uses this number internally for all file ownership and permission decisions.
student:x:1000:1000:Joe Student:/home/student:/bin/bash
The Group ID represents the user's primary group. In Red Hat systems, each user typically gets their own private group with the same name as their username. This means user "john" would have a primary group called "john" with the same numerical ID. This private group system provides better security defaults and makes file sharing more predictable.
student:x:1000:1000:Joe Student:/home/student:/bin/bash
The GECOS field holds descriptive information about the user - their full name, phone number, office location, or other contact details. This field is optional and often empty on server systems, but it's useful in organizations where you need to associate usernames with real people. Think of it as the "notes" field where you can store human-readable information about the account.
student:x:1000:1000:Joe Student:/home/student:/bin/bash
This field specifies where the user's personal files are stored. When someone logs in, this becomes their starting location - like their personal office in a large building. Regular users typically have home directories under /home/, like /home/student. System accounts might have different locations or no home directory at all if they don't need to store personal files.
student:x:1000:1000:Joe Student:/home/student:/bin/bash
The last field specifies what command interpreter the user gets when they log in. Regular users typically get /bin/bash, which is the standard interactive shell. System accounts often have /sbin/nologin, which prevents interactive logins - this is a security feature for accounts that exist only to run services, not for human users to log into.

Groups in Linux work like teams in an organization - they allow you to give the same permissions to multiple users at once. Instead of setting permissions individually for each user, you can create a group, add users to it, and then assign permissions to the entire group. This makes managing permissions much more efficient, especially in environments with many users.
/etc/group File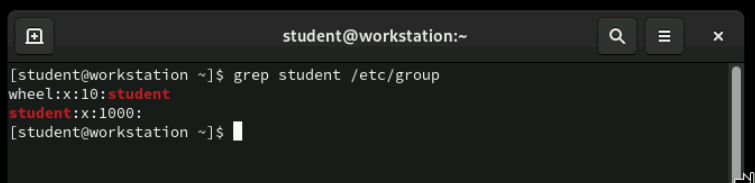
The /etc/group file stores group information using a similar colon-separated format as /etc/passwd. Each line represents one group and contains four fields of information. In this example, we can see that user student belongs to two groups: their private student group and the wheel group, which grants special administrative privileges.
wheel:x:10:student
The first field is the group name, which is what you'll use in commands to reference the group. Group names should be descriptive of their purpose - for example, developers, accounting, or wheel for administrative users. Like usernames, group names must be unique on the system.
wheel:x:10:student
Similar to the user password field, this was historically used for group passwords but is now typically empty or contains an x. Group passwords are rarely used in modern Linux systems since there are better ways to control group membership. Most groups don't need passwords - membership is controlled by administrators adding or removing users.
wheel:x:10:student
The GID is the numerical identifier for the group, similar to how UIDs work for users. The system uses this number internally to make permission decisions. Like UIDs, GIDs follow certain ranges - system groups get low numbers, while user-created groups typically start at 1000 or higher.
wheel:x:10:student,megan
The final field lists the usernames of group members, separated by commas. This shows supplementary group membership - users who belong to this group in addition to their primary group. Note that primary group membership isn't listed here; you need to check the /etc/passwd file to see primary group assignments.
Understanding the difference between primary and supplementary groups is crucial. Each user has exactly one primary group, which is usually their private group with the same name as their username. Users can belong to multiple supplementary groups for additional permissions. When you create a file, it's automatically assigned to your primary group, though you can temporarily change this behavior.

Now let's pause here to check your understanding with a graded quiz in Canvas. This quiz will test your knowledge of the /etc/passwd and /etc/group file formats we just covered. Take your time and refer back to these slides if needed - understanding these fundamentals is essential before we move on to user management commands.
The root account, also called the superuser, has unlimited power on a Linux system. While this might sound appealing, it's actually quite dangerous for everyday use. Running applications as root means that any security vulnerability could potentially compromise your entire system instead of just your user account. It's like having master keys to every room in a building - you only want to use them when absolutely necessary.
su)
[student@servera ~]$ su -l megan
Password:
megan@servera ~]$ pwd
/home/megan
The su command lets you "switch user" to become another user temporarily. In this example, student switches accounts to become user megan using su -l megan. The -l option (which stands for login) is important because it gives megan's complete environment, including her PATH and other settings. If you just type su without a username, it assumes you want to become root and will ask for the root password.
[student@servera ~]$ sudo grep wheel /etc/sudoers
## Allows people in group wheel to run all commands
%wheel  ALL=(ALL)   ALL
# %wheel    ALL=(ALL)   ALL=(ALL)   NOPASSWD: ALL
The sudoers file controls which users can run administrative commands using sudo. In Red Hat systems, members of the wheel group automatically get full sudo privileges - this is a convenient way to grant administrative access. Lines starting with pound symbol (#) are comments and don't affect the configuration. The sudoers file uses a specific syntax that we'll explore more in a later slide.
sudo Command
[megan@servera ~]$ sudo cd /etc/ssh/
[sudo] password for megan:
megan is not in the sudoers file. This incident will be reported
[megan@servera ~]$
Here we see what happens when someone tries to use sudo without proper permissions. When megan tries to run a command with sudo, the system denies her request because she's not in the sudoers file. Notice that this security violation gets logged to /var/log/secure - this logging helps administrators track unauthorized access attempts and maintain system security.
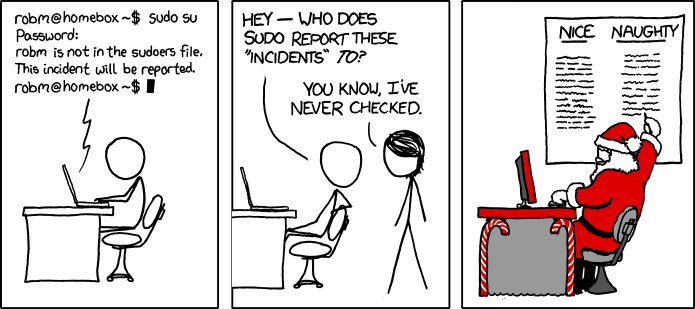
This humorous comic from xkcd perfectly captures how powerful the sudo command is in the Linux world. While it's a joke, it highlights an important point - sudo gives you tremendous power, so it should be used responsibly. The comic has become iconic in the Linux community because it resonates with anyone who's experienced the immediate power that comes with sudo access.
[student@servera ~]$ su -i
[sudo] password for root:
root@servera ~]#
The su -i command opens a root shell, similar to su -l root but shorter to type. The -i option stands for "interactive" and gives you a complete root environment. Once you're in a root shell, your prompt typically changes to show a pound symbol (#) instead of a dollar sign ($), reminding you that you're operating with unlimited privileges. Remember to exit the root shell when you're done to return to your regular user account.

The /etc/sudoers file controls sudo access, but you should never edit it directly with a regular text editor. Instead, always use the visudo command, which performs syntax checking before saving your changes. A syntax error in the sudoers file could lock you out of administrative access completely, so this safety check is crucial. You can also create additional configuration files in /etc/sudoers.d/ directory for better organization.
wheel Group
%wheel ALL=(ALL:ALL) ALL
Let's break down the sudoers file syntax using this wheel group example. The %wheel indicates this rule applies to all members of the wheel group (the % symbol denotes a group). The first ALL means this rule applies on all hosts, useful in networked environments. The second ALL means wheel group members can run commands as any user, and the third ALL means they can run any command. This combination gives complete administrative access.
/etc/sudoers.d Directory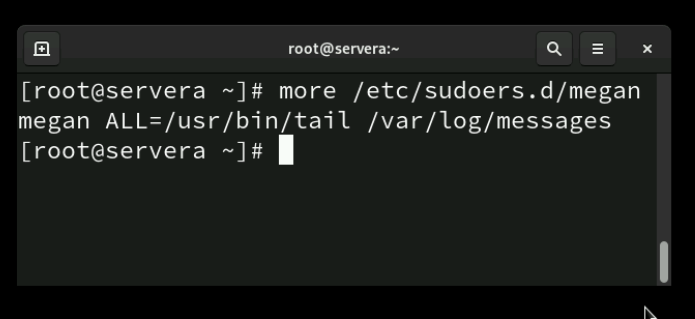
In Linux, the /etc/sudoers file controls which users are allowed to run commands with elevated privileges using sudo. Directly editing this file can be risky, since a mistake might lock you out of administrative access. To make management safer and more flexible, Linux provides the /etc/sudoers.d directory. This directory allows administrators to create small, separate configuration files—each one containing sudo rules for specific users, groups, or applications. The system reads all files in /etc/sudoers.d as if they were part of the main sudoers file. This modular approach makes it easier to organize permissions and reduces the chance of errors when updating settings. Remember, whether you edit /etc/sudoers or a file inside /etc/sudoers.d, you should always use the visudo command. This tool checks for syntax errors before saving, helping to prevent misconfigurations that could break sudo access.

Now it's time for some hands-on practice. Try switching to the root account using the methods we've discussed, and run a few commands to see how the system behaves differently. Notice how your command prompt changes and pay attention to the increased privileges you have. This practical experience will help solidify your understanding of user switching concepts.
Moving on to user management, let's learn how to create new user accounts. User creation in Red Hat Enterprise Linux is a two-step process: first you create the account structure with useradd, then you set a password with passwd. Until you assign a password, the account remains locked and unusable. This two-step approach gives you control over when the account becomes active.
[root@servera ~]# useradd megan
[root@servera ~]# passwd megan
Adding a user in Red Hat Enterprise Linux takes two steps. First the account must be created then a password assigned to the account. Until a password is assigned the account is locked.
[root@servera ~]# usermod -aG wheel megan
This example shows how to add user megan to the wheel group using usermod -aG wheel megan. The -a flag means "append" - this is crucial because without it, you'd remove megan from all her other supplementary groups and only leave her in wheel. The -G specifies supplementary groups. Adding someone to wheel gives them full sudo privileges, so use this power carefully.
[root@servera ~]# userdel -r megan
The userdel command removes user accounts from the system. The basic command only removes the account entries from system files but leaves the user's home directory intact. Adding the -r option removes the home directory and mail spool as well. Be very careful with the -r option - once you delete a user's home directory, their personal files are gone forever unless you have backups.
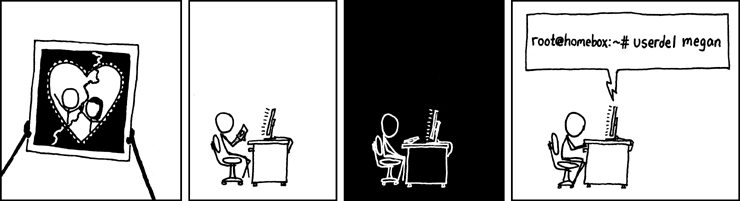
This cartoon is from the xkcd website.
[root@servera ~]# passwd megan
Changing password for user megan.
New password: redhat
BAD PASSWORD: The password is shorter than 8 characters
Retype new password: redhat
passwd: all authentication tokens updated successfully.
[root@host ~]#
The passwd command sets user passwords, and it enforces password policies defined by the system administrator. In this example, we see the system warning that a password doesn't meet policy requirements. The root user can override these policies, but regular users cannot - this prevents users from setting weak passwords that compromise security. Notice that no characters display while typing passwords for security reasons.
Time for another hands-on exercise. Create several user accounts on your system and set passwords for each one. Try creating users with different options and see how the system responds. Practice both the useradd and passwd commands until you're comfortable with the process. This practice will build your confidence in user management tasks.
[root@servera ~]# groupadd consultants
The groupadd command creates new groups on the system. The syntax is simple - the groupadd command followed by the group name creates a group with the next available GID and default settings. Groups are useful for organizing users who need similar permissions, such as a developers group for programmers or a sales group for sales staff. Creating logical groups makes permission management much easier.
[root@servera ~]# groupmod -n consoltants consultants
The groupmod command lets you modify existing groups. In this example, it's used to fix a typo in a group name. You can also use groupmod to change a group's GID, though this is less common and can cause permission issues if not done carefully. It's always better to get the group name right the first time, but groupmod provides a way to fix mistakes.
[root@servera ~]# groupdel consultants
Before deleting a group with groupdel, always use the find command to locate files owned by that group. Once you delete a group, files that belonged to it become owned by the numeric GID, which can create confusion later. Also remember that you cannot delete a group if it's the primary group for any user - you'd need to change those users' primary groups first.
[root@servera ~]# usermod -g users megan
The usermod -g command changes a user's primary group. Remember that each user can have only one primary group at a time, and this is the group that owns files they create by default. Changing primary groups is less common than adding supplementary groups, but it's useful when you need to change a user's default file ownership behavior.
[root@servera ~]# usermod -aG consultants megan
Here we see usermod -aG consultants megan, adds megan to the consultants group as a supplementary group. The -a (append) flag is crucial - without it, you'd replace all of megan's current supplementary groups with just consultants. This command is very common in system administration for granting additional permissions to users.
[megan@servera ~]$ newgrp consultants
A user's primary group can be temporarily changed to a supplementary group so new files create belong to the supplementary group.
Create groups, use them as supplementary groups for some users without changing those users' primary groups, and configure one of the groups with sudo access to run commands as root
Now let's explore password management and account security. Modern Linux systems store encrypted passwords in /etc/shadow rather than the world-readable /etc/passwd file. This change happened because dictionary attacks on encrypted passwords became common. The shadow file contains not just encrypted passwords, but also password aging information that helps enforce security policies.
[root@servera ~]# grep student /etc/shadow
student:$6$CSsXsd3rwghsdfarf:17933:0:99999:7:2:18113::
The /etc/shadow file follows the same colon-separated format as other system files, but it requires root privileges to read. Each line represents one user account and contains nine fields of password and account information. This file is the heart of Linux password security, containing everything the system needs to authenticate users and enforce password policies.
/etc/shadow file
student:$6$CSsXsd3rwghsdfarf:17933:0:99999:7:2:18113::
Like other system files, the first field in /etc/shadow is the username. This links the shadow entry to the corresponding entry in /etc/passwd. The system uses this connection to associate encrypted passwords with user accounts during the login process.
/etc/shadow file
student:$6$CSsXsd3rwghsdfarf:17933:0:99999:7:2:18113::
The second field contains the encrypted password, and the format tells us about the encryption method used. The $6$ prefix indicates SHA-512 hashing, which is currently considered secure. This field also includes a random salt that makes the encryption unique, preventing attackers from using precomputed password tables. If this field is empty, the account has no password and cannot be used for login.
/etc/shadow file
student:$6$CSsXsd3rwghsdfarf:17933:0:99999:7:2:18113::
This field shows when the password was last changed, expressed as the number of days since January 1, 1970 (called the Unix epoch). While this format isn't human-readable, it allows precise tracking of password age. The system uses this information to enforce password aging policies and warn users when passwords are getting old.
/etc/shadow file
student:$6$CSsXsd3rwghsdfarf:17933:0:99999:7:2:18113::
This field sets the minimum number of days that must pass before a user can change their password again. This prevents users from immediately changing their password back to the old one after being forced to change it. A value of 0 means users can change their password immediately, while higher values enforce a waiting period.
/etc/shadow file
student:$6$CSsXsd3rwghsdfarf:17933:0:99999:7:2:18113::
This field specifies the maximum number of days before a password must be changed. The five 9s (99999) shown in the example essentially means "never" - the password doesn't expire. Setting a lower value forces regular password changes, which some security policies require, though there's debate about whether forced password changes actually improve security.
/etc/shadow file
student:$6$CSsXsd3rwghsdfarf:17933:0:99999:7:2:18113::
This field determines how many days before password expiration the system starts warning the user. For example, setting this to 7 means users get warning messages for a week before their password expires. This gives users time to plan and change their passwords before being locked out of their accounts.
/etc/shadow file
student:$6$CSsXsd3rwghsdfarf:17933:0:99999:7:2::18113::
This field specifies how many days after password expiration the account remains usable before being automatically locked. This grace period allows users who missed the expiration deadline to still log in and change their password. After this period expires, an administrator must unlock the account manually.
/etc/shadow file
student:$6$CSsXsd3rwghsdfarf:17933:0:99999:7:2::18113:::
This field sets an absolute expiration date for the account, regardless of password status. It's expressed in days since the Unix epoch, just like the password change date. An empty field means the account never expires. This feature is useful for temporary accounts or contractors with known end dates.
/etc/shadow file
student:$6$CSsXsd3rwghsdfarf:17933:0:99999:7:2:18113::
The final field is reserved for future use and is typically empty. Linux developers included this field to allow for future enhancements to password management without changing the file format. You can safely ignore this field in current Linux systems.
$6$CSsXcYG1L4ZfHr$2W6evvJahUfzfHpc9X.45Jc6H30E
Let's break down the components of an encrypted password hash. The algorithm identifier ($6$) tells us SHA-512 is being used. The salt is a random string that makes each password hash unique, even if two users have the same password. The final component is the actual hash of the user's password combined with the salt. This multi-part approach provides strong security against various attack methods.
$6$CSsXcYG1L4ZfHr$2W6evvJahUfzfHpc9X.45Jc6H30E
The salt in use to cryptographically hash the password.
$6$CSsXcYG1L4ZfHr$2W6evvJahUfzfHpc9X.45Jc6H30E
The cryptographical hash of the user's password; combining the salt and the plain text password and then cryptographically hashing to generate the password hash.
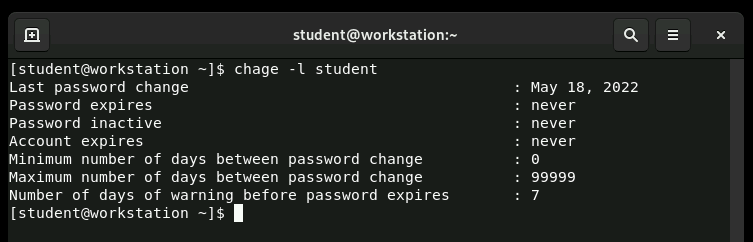
The chage (change age) command displays and modifies password aging information. When run without options, it shows current password aging settings for a user. Root can view this information for any user, while regular users can only see their own information. The command provides a user-friendly way to work with password policies without directly editing the shadow file.
[root@servera ~]# usermod -L megan
The usermod -L command locks a user account by adding an exclamation mark to the beginning of the encrypted password field. This makes the password hash invalid, preventing login while preserving the original password. To unlock the account, use usermod -U. Account locking is useful for temporarily disabling accounts without deleting them completely.

Setting a user's shell to /sbin/nologin prevents interactive logins while still allowing the account to exist for other purposes. This is commonly used for system service accounts that need to own files and processes but should never be used for human login. When someone tries to log in to a nologin account, they receive a polite message explaining that the account is not available for interactive use.
Here's another hands-on exercise to reinforce your learning. Practice setting password policies for several users using the commands we've discussed. Try different combinations of password aging settings and see how they affect user login behavior. This practical experience will help you understand how password policies work in real-world situations..
/etc/passwd, /etc/group, and /etc/shadow critical files contain user and group information.su and sudo commands.useradd, usermod, and userdel commands manage users.groupadd, groupmod, and groupdel commands manage groups.passwd command manages passwords for users.chage command displays and configures password expiration settings for users./etc/login.defs file contains password policy information.Congratulations on completing this comprehensive lesson on managing local users and groups in Linux! You've learned about user and group file formats, user switching and privilege escalation, account creation and deletion, and password policy management. These skills form the foundation of Linux system administration and security. Keep practicing these commands and concepts - they'll serve you well throughout your Linux journey.

This final exercise brings together everything we've learned in this lesson. You'll set default password policies, create a supplementary group, add users to it, configure sudo access, and modify individual password policies. This comprehensive lab simulates real-world system administration tasks and will test your understanding of all the concepts we've covered.
Thanks for watching. This is the end of the presentation.
Created on 17 February 2025 by Dennis Kibbe. Last modified on 11 September by DNK.
Keyboard Shortcuts
Today we're diving into one of the most fundamental concepts in Linux security - how the system manages users and groups. Every single file on your Linux system has an owner and belongs to a group, which determines who can access it and what they can do with it. Think of it like your personal belongings at home - you own your laptop, but you might share the living room TV with your family members. Let's explore how Linux keeps track of who owns what. This slide presentation was created by B6Plus. The audio accompanying this presentation is AI-generated