Interpret Linux File System Permissions
Introduction
After completing the work in this module you will be able to:
Let's start with the big picture - every single file and directory on a Linux system has three key properties: an owner, a group it belongs to, and a set of permissions that control access. Think of this like a filing cabinet where each folder has labels showing who owns it, which department it belongs to, and what each person is allowed to do with the contents. This system ensures that sensitive files stay protected while allowing appropriate sharing when needed.
| Permission | Effect on Files | Effect on Directories |
|---|---|---|
| r (read) | Content of file can be read. | Contents can be listed. |
| w (write) | Content of file can be changed. | Files can be created or deleted. |
| x (execute) | File can be run as a command. | The cd command can be used. |
Here's where things get interesting - permissions work differently for directories than they do for regular files. For a directory, read permission means you can list what's inside it, write permission lets you create or delete files within it, and execute permission allows you to actually enter the directory using the cd command. It's like the difference between being able to see through a window, having keys to rearrange furniture, and having permission to walk through the door.
[student@workstation ~]$ ls -l myscript.sh
-rwxrwxr--. 1 student student 1520 May  18 07:36 myscript.sh
The ls -l command is your primary tool for examining file permissions and ownership - think of it as your detective magnifying glass. When you run this command, you get a detailed listing that shows not just filenames, but all the security information attached to each file. Let's break down what each column tells us about our files.
-rwxrwxr--. 1 student student 1520 May 18 07:36 myscript.sh
The very first character in the permission string tells us what type of file we're looking at. A dash (-) means it's a regular file like a document or program, a 'd' indicates it's a directory or folder, and an 'l' shows it's a symbolic link - basically a shortcut pointing to another file. This is important because the same permission settings can mean different things depending on the file type.
-rwxrwxr--. 1 student student 1520 May 18 07:36 myscript.sh
After the file type, the next nine characters show permissions in three groups of three - first for the owner, then for the group, and finally for everyone else on the system. Each group shows read (r), write (w), and execute (x) permissions, with dashes indicating where permissions are missing. It's like reading a security badge that shows exactly what each category of person is allowed to do.
-rwxrwxr--. 1 student student 1520 May 18 07:36 myscript.sh
That period you might see after the permission string indicates that SELinux is also controlling access to this file. SELinux is an additional security layer that provides mandatory access control - think of it as an extra security guard that enforces rules beyond the basic file permissions. We'll cover SELinux in more detail in later courses.
-rwxrwxr--. 1 student student 1520 May 18 07:36 myscript.sh
The number after permissions shows how many links point to this file - usually 1 for regular files, but directories always have at least 2 because of the way the filesystem works.
-rwxrwxr--. 1 student student 1520 May 18 07:36 myscript.sh
Next you'll see the owner's username and the group name. Regular users typically have their own private group with the same name as their username, which helps organize permissions in multi-user environments.
-rwxrwxr--. 1 student student 1520 May 18 07:36 myscript.sh
-rwxrwxr--. 1 student student 1520 May 18 07:36 myscript.sh
The size field shows how many bytes the file contains - adding the -h option to ls makes these numbers human-readable with K, M, or G suffixes.
-rwxrwxr--. 1 student student 1520 May 18 07:36 myscript.sh
The timestamp shows when the file was last modified, which is crucial for troubleshooting and understanding when changes were made.
-rwxrwxr--. 1 student student 1520 May 18 07:36 myscript.sh
The final field is simply the filename or directory name.

After reading this section in the textbook complete the quiz in Canvas.
Now let's learn how to actually change permissions using the chmod command - short for "change mode." This powerful command lets you modify who can access files and what they can do with them. You can use chmod in two different ways: symbolic method using letters, or octal method using numbers.
[student@workstation ~]$ man -k permissions
access (2)        - check user's permissions for a file
chmod (2)         - change permissions of a file
console.perms (5) - permissions control file for users at the system console
...
The chmod or "change mode" command is used to change file permissions. The command can be used to change permissions by the symbolic method or the octal method.
[joe@localhost ~]$ ls -l myscript.sh
-rw-r--r-- 1 joe joe 1824 Sep 14 12:47 myscript.sh
[joe@localhost ~]$ chmod g+x myscript.sh
[joe@localhost ~]$ ls -l myscript.sh
-rwxr-xr-x 1 joe joe 1824 Sep 14 12:47 myscript.sh
| Number | Description |
|---|---|
| 4 | Permission to read file. |
| 2 | Permission to write to file. |
| 1 | Permission to run file as a program. |
| 0 | No permissions |
The octal or numeric method often feels easier once you understand the pattern. Each permission has a number value: read is 4, write is 2, and execute is 1. You add these numbers together to get the permission value for each category. For example, read plus write equals 6 (4+2), while read plus execute equals 5 (4+1).
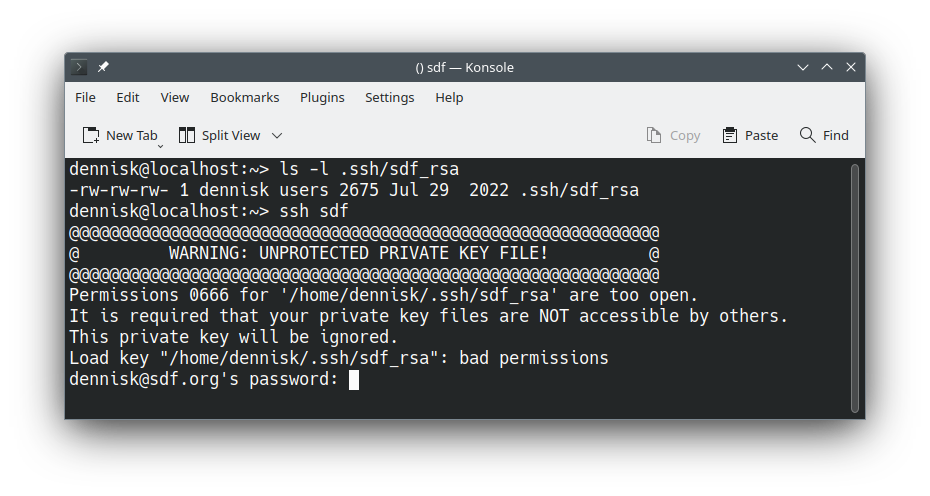
Here's a real-world example where permissions matter critically. SSH private keys must be readable only by their owner for security reasons - if others can read your private key, they could impersonate you on remote systems. The chmod 600 command sets read and write for the owner (6) and no permissions for group or others (0,0).
[student@workstation ~]$ ls -l ~/.ssh/id_rsa
-rw-rw-rw-. 1 student student 2675 Jul 29 2022 .ssh/id_rsa
[student@workstation ~]$ chmod 0600 .ssh/id_rsa
[student@workstation ~]$ ls -l ~/.ssh/id_rsa
-rw-------. 1 student student 2675 Jul 29 2022 .ssh/id_rsa
The chmod command used here fixes the issue with the SSH private key shown previously. The order of permissions is special permissions (0), User permissions (read plus write), and no permissions (0) for group or others.

Every file has both an owner and a group, and understanding ownership is just as important as understanding permissions. When you create a new file, you automatically become its owner, and it belongs to your primary group. Only the root user can change file ownership, but you can change a file's group to any group you belong to.
[student@workstation ~]$ ls -l ~/mydoc.md
-rw-rw-rw- 1 student student 2675 Jul 29 2022 mydoc.md
[student@workstation ~]$ chown student:consultants mydoc.md
[student@workstation ~]$ ls -l ~/mydoc.md
-rw- - - - - - - 1 student consultants 2675 Jul 29 2022 mydoc.md
The chown command changes file ownership, and notice the syntax uses a colon to separate the user and group. In this example, we're changing the group to "consultant" while leaving the owner unchanged. This is commonly done when files need to be shared among team members.

Check Canvas for any Lab Notes for this Guided Exercise.
One of the most practical applications of file permissions is creating directories where team members can collaborate. We'll learn how to set up a directory where all members of a specific group can add and delete files while maintaining security. This involves understanding default permissions and special permission bits.
[student@workstation ~]$ which passwd
/usr/bin/passwd
[student@workstation ~]$ ls -l /usr/bin/passwd
-rwsr-xr-x 1 root root 59976 Nov 24  2022 /usr/bin/passwd
Sometimes programs need special privileges to do their job. The passwd command is a perfect example - when you change your password, it needs to write to the /etc/shadow file, which only root can normally modify. The setuid bit allows the program to run with the permissions of the file's owner rather than the user running it.
[student@workstation ~]$ ls -ld /tmp
drwxrwxrwt 19 root root 4096 Feb  7 08:26 /tmp/
The sticky bit is a special permission that's commonly used on directories like /tmp. When set on a directory, it prevents users from deleting or modifying files they don't own, even if they have write permission to the directory. This allows shared directories to function safely without users accidentally damaging each other's files.
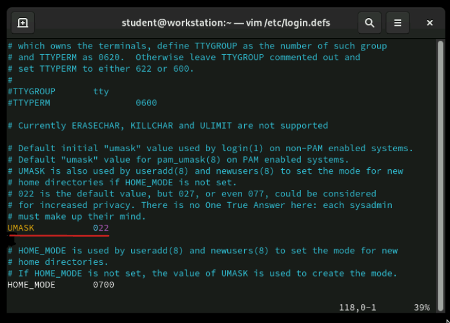
When you create new files, they don't start with random permissions - they inherit default permissions that are controlled by a setting called umask. The umask value is defined in /etc/login.defs and determines what permissions are automatically removed from new files. Think of umask as a template that shapes every new file you create.
umask Utility on Permissions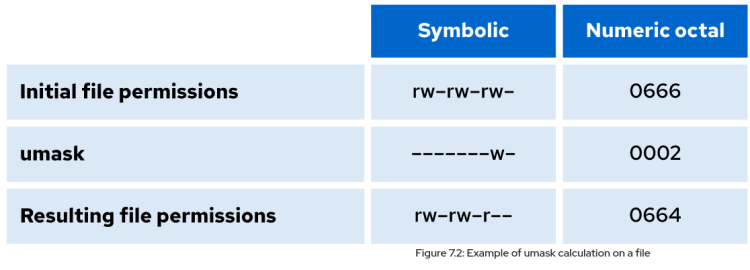
umask command
[student@workstation ~]$ umask
0022
The umask command without an arguments displays the current value of the umask.
umask
[student@workstation ~]$ umask 0002
Regular users can temporarily change their umask for the current session using the umask command with a new value. This is useful when you need to create files with different default permissions than usual. The change only lasts until you log out or open a new shell session.
Control the permissions on files that are created in a directory by using umask settings and the setgid permission.
ls -l command displays file permissions and file ownership.-d option to ls -l to display the permissions for the directory itself.chmod command changes permissions.chown command changes the owner of a file or the group to which a file belongs.umask command displays or changes temporarily the default permissions for files.suid, sgid, and sticky bit special permissions provide additional access-related features to files.chmod command: 2-Minute Linux Tipschown command: 2-Minute Linux Tipsumask command: 2-Minute Linux TipsHere are some resources so you can continue your learning.

This lab is an excellent opportunity to practice using the Esc+. keyboard shortcut in the command line, which inserts the last argument from your previous command. This technique, covered in Chapter 2, can significantly speed up your workflow when working with file permissions and paths.
We've covered the essential concepts of Linux file permissions - from reading permission displays to modifying ownership and creating collaborative directories. These skills form the foundation of Linux system security and file management. Practice these commands regularly, as you'll use them constantly in real Linux administration work. This is the end of the presentation.
Created on 17 February 2025 by Dennis Kibbe. Last modified on 11 September 2025 by DNK.
Keyboard Shortcuts
Today we're diving into one of the most fundamental concepts in Linux system administration - file permissions and access control. Understanding how Linux controls who can read, write, and execute files is essential for keeping systems secure and organized. We'll learn how to view current permissions, modify them, and set up directories where groups can collaborate effectively. This slide presentation was created by B6Plus. The audio accompanying this presentation is AI-generated.